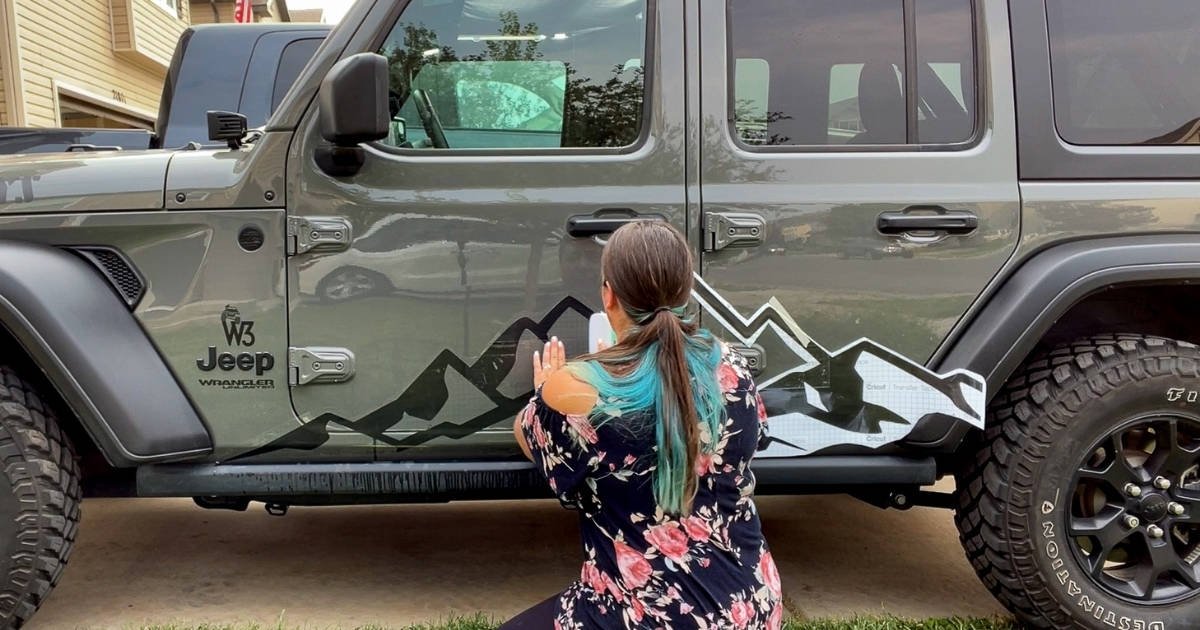
To apply Jeep decals, clean the surface, peel the backing, align the decal, and press firmly for adhesion. Jeep decals can be a great way to personalize your vehicle and give it a unique look.
Whether you want to showcase your love for off-roading or simply add some personal style to your ride, applying Jeep decals is a simple process that anyone can do. By following a few easy steps, you can have your Jeep looking like a custom masterpiece in no time.
We will guide you through the process of applying Jeep decals, so you can showcase your personality and make your Jeep stand out from the crowd. So, let’s get started and transform your ride!
Contents
Must-Have Tools For A Successful Application
Applying Jeep decals requires the right tools for a successful application. One must-have tool is a squeegee, which helps smooth out any air bubbles or wrinkles. A clean cloth is also essential for wiping the surface and ensuring a strong bond.
Additionally, masking tape is useful for aligning the decal properly before applying it. To prevent any difficulties during application, a water and soap solution can be prepared. This solution aids in sliding the decal into position and allows for adjustment if needed.
By having these tools on hand, the process of applying Jeep decals becomes easier and more efficient. Remember to follow the instructions carefully to achieve a professional-looking result.
Optional Tools For Extra Precision
Jeep decals can be applied with extra precision using optional tools like a precision knife and a measuring tape. These tools are essential for achieving accurate results. The precision knife allows you to make precise cuts and remove any excess material.
The measuring tape ensures that the decals are applied evenly and aligned properly. By using these optional tools, you can enhance the overall quality of the decal application process. Take your time and measure carefully to avoid any mistakes. Applying jeep decals is a simple process, but with the right tools, you can achieve a professional and precise look.
Remember to follow the manufacturer’s instructions and take your time to ensure a successful application. Enjoy customizing your jeep with high-quality decals!
Cleaning The Surface
To ensure proper application of Jeep decals, the first step is to clean the surface thoroughly. Start by washing the Jeep using a mild soap and water solution. This will remove any dirt or debris that could interfere with the decal adhesion.
Pay special attention to areas where the decal will be applied. Next, remove any wax residue by using a wax remover or degreaser. This step is crucial as wax can create a barrier and prevent the decal from sticking properly.
Once the surface is clean, dry it thoroughly with a clean, lint-free cloth. This will ensure that the decal adheres properly and doesn’t peel or bubble over time. By following these steps, you can ensure a smooth and long-lasting application of Jeep decals.
Marking The Placement
Jeep decals are a great way to personalize your vehicle and showcase your style. When applying these decals, it is important to mark the placement accurately. One effective method is to use masking tape as guidelines. Begin by cleaning the surface where the decal will be applied.
Then, position the decal on the desired area and secure it with small strips of masking tape. This will create a temporary guideline for proper placement. Next, step back and ensure the decal is positioned straight and aligned with the vehicle’s body lines.
Once you are satisfied with the placement, slowly remove the backing paper from the decal and press it firmly onto the surface, smoothing out any bubbles or wrinkles. Finally, carefully remove the masking tape, leaving behind a clean and perfectly placed jeep decal.
By following these guidelines, you can easily apply your jeep decals with precision and confidence.
Wet Application Method
Jeep decals can be applied using the wet application method. Before starting, make sure the decal is properly prepared. Wet the surface where the decal will be applied, as this allows for easier positioning. Carefully align the decal and press it onto the wet surface, using a squeegee to remove any air bubbles.
Take your time to ensure a smooth application. Once the decal is in place, allow it to dry before touching or moving it. By following these simple steps, you can easily apply Jeep decals using the wet application method. Enjoy customizing your Jeep with unique and eye-catching designs.

Credit: m.youtube.com
Dry Application Method
Applying Jeep decals is a simple process that can completely transform the look of your vehicle. The dry application method is a popular choice when it comes to applying decals. To begin, you’ll need to prepare the decal by cleaning the surface thoroughly.
Make sure there are no dust or dirt particles that may interfere with the adhesion. Next, carefully peel off the backing paper, ensuring that the decal remains intact. Then, position the decal on the desired area, using a ruler or tape measure for accuracy.
Slowly apply pressure, smoothing out any air bubbles as you go. Finally, gently remove the transfer tape, leaving only the decal on the surface. With these simple steps, you’ll be able to apply Jeep decals with ease and achieve a professional-looking result.
Removing Excess Water
To properly apply jeep decals, it is essential to remove excess water. After applying the decal, ensure that there is no lingering water on the surface. To dry the decal, gently wipe away any residual water using a clean, dry cloth.
Make sure to avoid leaving behind any water droplets as this can cause the decal to not adhere properly. Take your time and be thorough when drying the decal to ensure a smooth and long-lasting application. By following these steps, you can achieve a professional-looking finish for your jeep decals.
Trimming The Edges
When applying Jeep decals, trimming the edges is crucial to achieve a clean and neat finish. Start by carefully positioning the decal on the desired surface. Use a sharp utility knife to trim any excess vinyl material from the edges.
Make sure to follow the contours of the surface for a seamless look. Take your time and make precise cuts. It’s important to avoid any jagged or uneven edges. Once you have trimmed the decal, use a plastic squeegee or a credit card to firmly press down the edges, ensuring they adhere properly.
This step will help prevent any lifting or peeling. Before removing the transfer tape, double-check all the edges to ensure they are clean and smooth. Taking your time during the trimming process will result in a professional-looking application of your Jeep decals.
Longevity And Maintenance Tips
Jeep decals can add a stylish touch to your vehicle, but to ensure their longevity, proper maintenance is crucial. Harsh cleaning agents should be avoided when cleaning your decals. Regularly inspecting and touching up the decals will help prevent any damage or peeling.
Simple maintenance tasks, such as gently wiping them with a mild soap and water solution, can keep your decals looking fresh and vibrant. It’s important to note that abrasive substances or tools should never be used on the decals, as they can cause scratches or other irreversible damage.
By following these maintenance tips, you can enjoy your Jeep decals for years to come.
Frequently Asked Questions On How To Apply Jeep Decals
What Is The Best Way To Install Decals?
To install decals effectively, clean the surface first, peel off the backing, align carefully, and smooth out any air bubbles.
How Do You Put A Decal On A Jeep Window?
To put a decal on a jeep window, clean the window, peel off the backing, apply the decal, smooth out any air bubbles, and let it dry.
How Do You Apply A Decal Step By Step?
Step 1: Clean the surface thoroughly. Step 2: Remove the backing paper from the decal. Step 3: Place the decal on the desired area. Step 4: Smooth out any air bubbles and press it firmly.
Should Decals Be Wet Or Dry?
Decals should be applied dry for best results. Wet application may cause bubbles or wrinkles.
Conclusion
By following the step-by-step guide provided in this blog post, you can confidently apply decals to your Jeep without any difficulties. Whether you choose to do it yourself or seek professional assistance, the process is fairly straightforward. Remember to thoroughly clean and prepare the surface before applying the decal.
Use the appropriate tools and techniques to ensure a smooth and bubble-free application. Take your time and follow the instructions carefully, paying attention to any unique considerations for your specific decals. With a little practice and patience, you will be able to apply Jeep decals like a pro.
Adding decals to your Jeep can be a fun and creative way to personalize your vehicle and showcase your style. So go ahead, get started, and enjoy the process of transforming your Jeep into a unique and eye-catching ride.
Affiliate Disclosure: As an Amazon Associate, I earn from qualifying purchases made through links on this site.


